NCM-MCI-6.5 Online Practice Questions

Home / Nutanix / NCM-MCI-6.5

Latest NCM-MCI-6.5 Exam Practice Questions

The practice questions for NCM-MCI-6.5 exam was last updated on 2025-06-01 .

Viewing page 1 out of 1 pages.

Viewing questions 1 out of 5 questions.

Question#1

Task 5
An administrator has been informed that a new workload requires a logically segmented network to meet security requirements.
Network configuration:
VLAN: 667
Network: 192.168.0.0
Subnet Mask: 255.255.255.0
DNS server: 34.82.231.220
Default Gateway: 192.168.0.1
Domain: cyberdyne.net
IP Pool: 192.168.9.100-200
DHCP Server IP: 192.168.0.2
Configure the cluster to meet the requirements for the new workload if new objects are required, start the name with 667.
See the Explanation for step by step solution.

A. To configure the cluster to meet the requirements for the new workload, you need to do the following steps:
Create a new VLAN with ID 667 on the cluster. You can do this by logging in to Prism Element and going to Network Configuration > VLANs > Create VLAN. Enter 667 as the VLAN ID and a name for the VLAN, such as 667_VLAN.
Create a new network segment with the network details provided. You can do this by logging in to Prism Central and going to Network > Network Segments > Create Network Segment. Enter a name for the network segment, such as 667_Network_Segment, and select 667_VLAN as the VLAN. Enter 192.168.0.0 as the Network Address and 255.255.255.0 as the Subnet Mask. Enter 192.168.0.1 as the Default Gateway and 34.82.231.220 as the DNS Server. Enter cyberdyne.net as the Domain Name.
Create a new IP pool with the IP range provided. You can do this by logging in to Prism Central and going to Network > IP Pools > Create IP Pool. Enter a name for the IP pool, such as 667_IP_Pool, and select 667_Network_Segment as the Network Segment. Enter 192.168.9.100 as the Starting IP Address and

Question#2

Task 11
An administrator has noticed that after a host failure, the SQL03 VM was not powered back on from another host within the cluster. The Other SQL VMs (SQL01, SQL02) have recovered properly in the past.
Resolve the issue and configure the environment to ensure any single host failure affects a minimal number os SQL VMs.
Note: Do not power on any VMs
See the Explanation for step by step solution.

A. One possible reason why the SQL03 VM was not powered back on after a host failure is that the cluster was configured with the default (best effort) VM high availability mode, which does not guarantee the availability of VMs in case of insufficient resources on the remaining hosts. To resolve this issue, I suggest changing the VM high availability mode to guarantee (reserved segments), which reserves some memory on each host for failover of VMs from a failed host. This way, the SQL03 VM will have a higher chance of being restarted on another host in case of a host failure.
To change the VM high availability mode to guarantee (reserved segments), you can follow these steps:
Log in to Prism Central and select the cluster where the SQL VMs are running.
Click on the gear icon on the top right corner and select Cluster Settings.
Under Cluster Services, click on Virtual Machine High Availability.
Select Guarantee (Reserved Segments) from the drop-down menu and click Save.
To configure the environment to ensure any single host failure affects a minimal number of SQL VMs, I suggest using anti-affinity rules, which prevent VMs that belong to the same group from running on the same host. This way, if one host fails, only one SQL VM will be affected and the other SQL VMs will continue running on different hosts.
To create an anti-affinity rule for the SQL VMs, you can follow these steps:
Log in to Prism Central and click on Entities on the left menu.
Select Virtual Machines from the drop-down menu and click on Create Group.
Enter a name for the group, such as SQL Group, and click Next.
Select the SQL VMs (SQL01, SQL02, SQL03) from the list and click Next.
Select Anti-Affinity from the drop-down menu and click Next.
Review the group details and click Finish.
I hope this helps.
How else can I help?
https://portal.nutanix.com/page/documents/details?targetId=AHV-Admin-Guide-v6_5:ahv-affinity-policies-c.htm
A screenshot of a computer Description automatically generated with medium confidence


Question#3

Task 15
An administrator found a CentOS VM, Cent_Down, on the cluster with a corrupted network stack. To correct the issue, the VM will need to be restored from a previous snapshot to become reachable on the network again.
VM credentials:
Username: root
Password: nutanix/4u
Restore the VM and ensure it is reachable on the network by pinging 172.31.0.1 from the VM.
Power off the VM before proceeding.
See the Explanation for step by step solution.

A. To restore the VM and ensure it is reachable on the network, you can follow these steps:
Log in to the Web Console of the cluster where the VM is running.
Click on Virtual Machines on the left menu and find Cent_Down from the list. Click on the power icon to power off the VM.
Click on the snapshot icon next to the power icon to open the Snapshot Management window.
Select a snapshot from the list that was taken before the network stack was corrupted. You can use the date and time information to choose a suitable snapshot.
Click on Restore VM and confirm the action in the dialog box. Wait for the restore process to complete.
Click on the power icon again to power on the VM.
Log in to the VM using SSH or console with the username and password provided.
Run the command ping 172.31.0.1 to verify that the VM is reachable on the network. You should see a reply from the destination IP address.
Go to VMS from the prism central gui
Select the VMand go to More -> Guest Shutdown
Go to Snapshots tab and revert to latest snapshot available
power on vm and verify if ping is working

Question#4

Task 1
An administrator has been asked to configure a storage for a distributed application which uses large data sets across multiple worker VMs.
The worker VMs must run on every node. Data resilience is provided at the application level and low cost per GB is a Key Requirement.
Configure the storage on the cluster to meet these requirements. Any new object created should include the phrase Distributed_App in the name.
See the Explanation for step by step solution.

A. To configure the storage on the cluster for the distributed application, you can follow these steps:
Log in to Prism Element of cluster A using the credentials provided.
Go to Storage > Storage Pools and click on Create Storage Pool.
Enter a name for the new storage pool, such as Distributed_App_Storage_Pool, and select the disks to include in the pool. You can choose any combination of SSDs and HDDs, but for low cost per GB, you may prefer to use more HDDs than SSDs.
Click Save to create the storage pool.
Go to Storage > Containers and click on Create Container.
Enter a name for the new container, such as Distributed_App_Container, and select the storage pool that you just created, Distributed_App_Storage_Pool, as the source.
Under Advanced Settings, enable Erasure Coding and Compression to reduce the storage footprint of the data. You can also disable Replication Factor since data resilience is provided at the application level. These settings will help you achieve low cost per GB for the container.
Click Save to create the container.
Go to Storage > Datastores and click on Create Datastore.
Enter a name for the new datastore, such as Distributed_App_Datastore, and select NFS as the datastore type.
Select the container that you just created, Distributed_App_Container, as the source.
Click Save to create the datastore.
The datastore will be automatically mounted on all nodes in the cluster. You can verify this by going to Storage > Datastores and clicking on Distributed_App_Datastore. You should see all nodes listed under Hosts.
You can now create or migrate your worker VMs to this datastore and run them on any node in the cluster.
The datastore will provide low cost per GB and high performance for your distributed application.

Question#5

Task 8
Depending on the order you perform the exam items, the access information and credentials could change.
Please refer to the other item performed on Cluster B if you have problems accessing the cluster.
The infosec team has requested that audit logs for API Requests and replication capabilities be enabled for all clusters for the top 4 severity levels and pushed to their syslog system using highest reliability possible. They have requested no other logs to be included.
Syslog configuration:
Syslog Name: Corp_syslog
Syslop IP: 34.69.43.123
Port: 514
Ensure the cluster is configured to meet these requirements.
See the Explanation for step by step solution.

A. To configure the cluster to meet the requirements of the infosec team, you need to do the following steps:
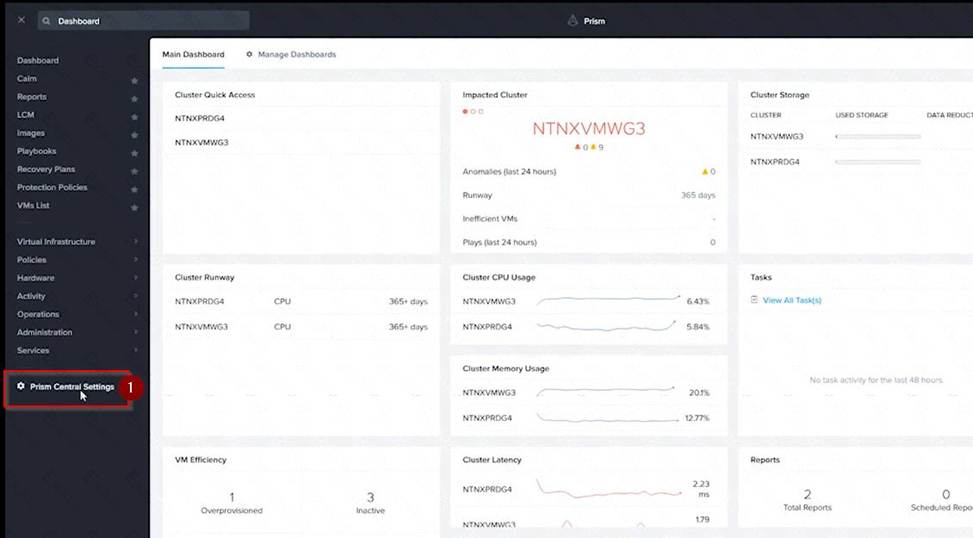
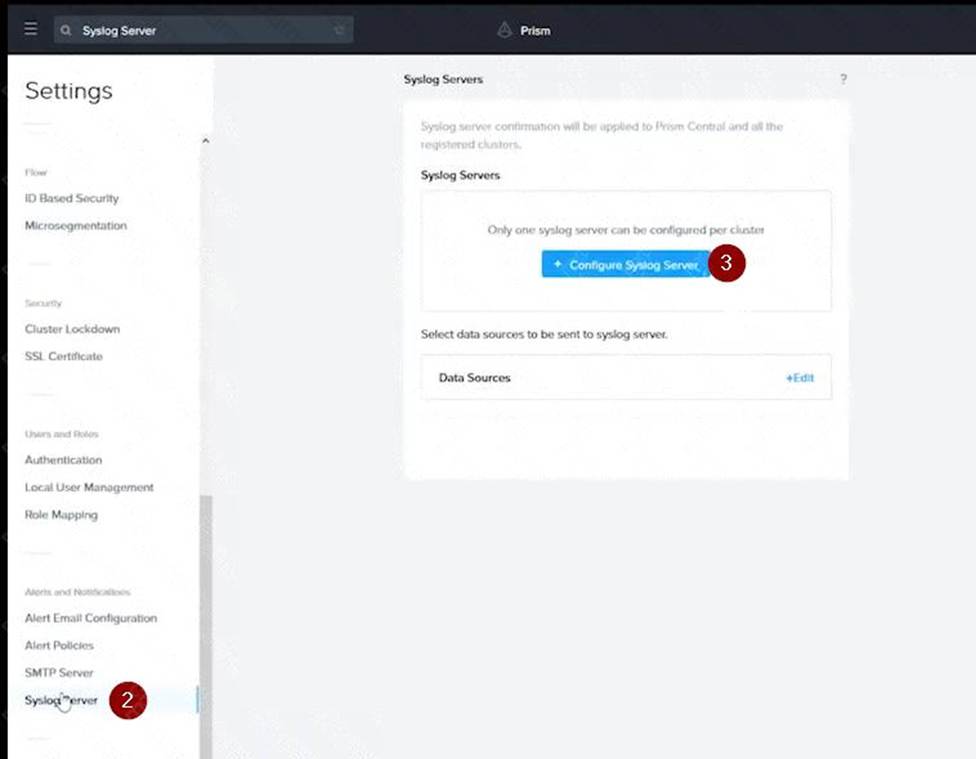
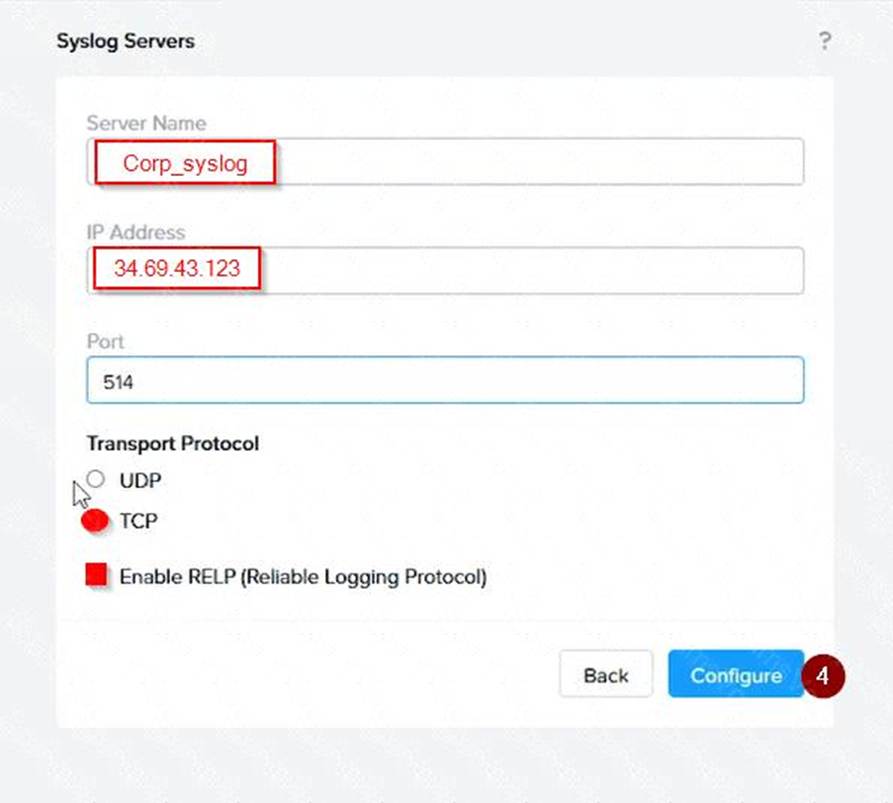
Log in to Prism Central and go to Network > Syslog Servers > Configure Syslog Server. Enter Corp_syslog as
the Server Name, 34.69.43.123 as the IP Address, and 514 as the Port. Select TCP as the Transport Protocol and enable RELP (Reliable Logging Protocol). This will create a syslog server with the highest reliability possible.
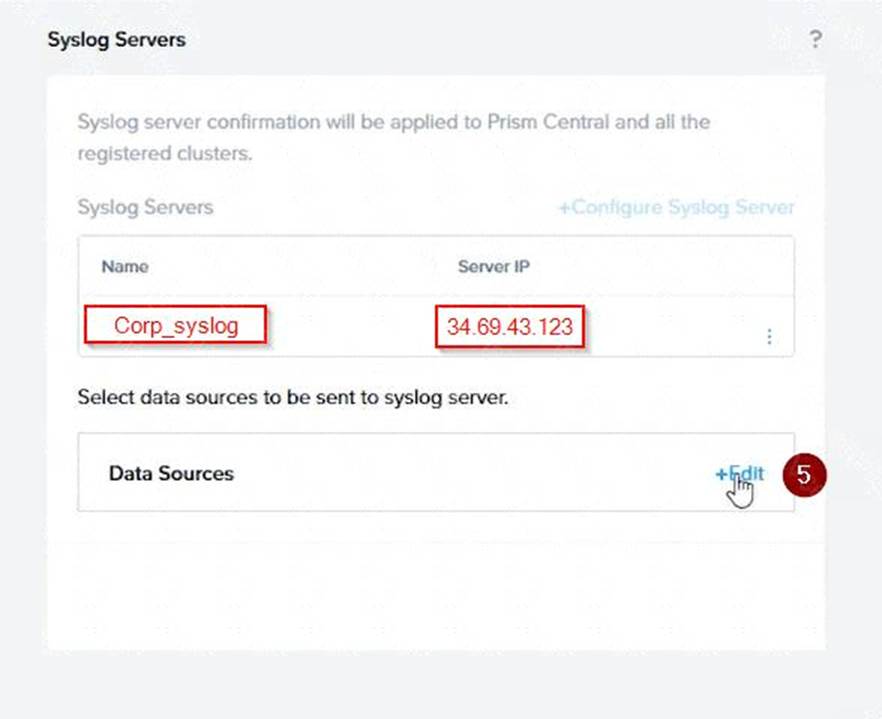
Click Edit against Data Sources and select Cluster B as the cluster. Select API Requests and Replication as the data sources and set the log level to CRITICAL for both of them. This will enable audit logs for API requests and replication capabilities for the top 4 severity levels (EMERGENCY, ALERT, CRITICAL, and ERROR) and push them to the syslog server. Click Save.
Repeat step 2 for any other clusters that you want to configure with the same requirements.


To configure the Nutanix clusters to enable audit logs for API Requests and replication capabilities, and push them to the syslog system with the highest reliability possible, you can follow these steps:
Log in to the Nutanix Prism web console using your administrator credentials.
Navigate to the "Settings" section or the configuration settings interface within Prism.
Locate the "Syslog Configuration" or "Logging" option and click on it.
Configure the syslog settings as follows:
Syslog Name: Enter "Corp_syslog" as the name for the syslog configuration.
Syslog IP: Set the IP address to "34.69.43.123", which is the IP address of the syslog system.
Port: Set the port to "514", which is the default port for syslog.
Enable the option for highest reliability or persistent logging, if available. This ensures that logs are sent reliably and not lost in case of network interruptions.
Save the syslog configuration.
Enable Audit Logs for API Requests:
In the Nutanix Prism web console, navigate to the "Cluster" section or the cluster management interface.
Select the desired cluster where you want to enable audit logs.
Locate the "Audit Configuration" or "Security Configuration" option and click on it.
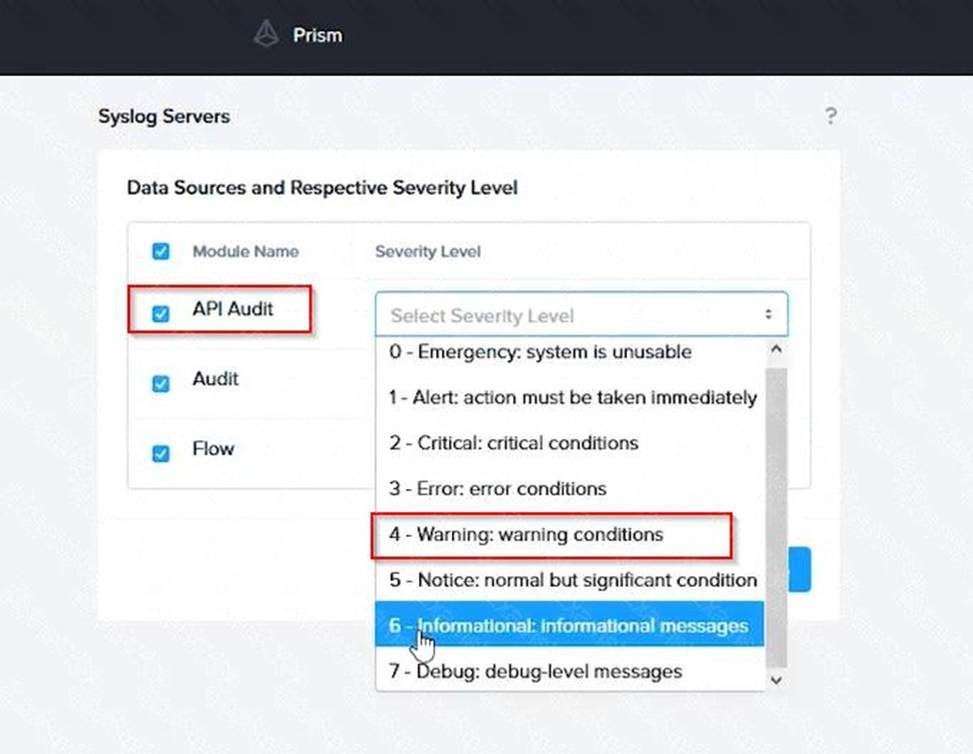
Look for the settings related to audit logs and API requests. Enable the audit logging feature and select the top 4 severity levels to be logged.
Save the audit configuration.
Enable Audit Logs for Replication Capabilities:
In the Nutanix Prism web console, navigate to the "Cluster" section or the cluster management interface.
Select the desired cluster where you want to enable audit logs.
Locate the "Audit Configuration" or "Security Configuration" option and click on it.
Look for the settings related to audit logs and replication capabilities. Enable the audit logging feature and select the top 4 severity levels to be logged.
Save the audit configuration.
After completing these steps, the Nutanix clusters will be configured to enable audit logs for API Requests and replication capabilities. The logs will be sent to the specified syslog system with the highest reliability possible.
ncli
<ncli> rsyslog-config set-status enable=false
<ncli> rsyslog-config add-server name=Corp_Syslog ip-address=34.69.43.123 port=514 network-protocol=tdp relp-enabled=false
<ncli> rsyslog-config add-module server-name= Corp_Syslog module-name=APLOS level=INFO
<ncli> rsyslog-config add-module server-name= Corp_Syslog module-name=CEREBRO level=INFO
<ncli> rsyslog-config set-status enable=true
https://portal.nutanix.com/page/documents/kbs/details?targetId=kA00e0000009CEECA2

Exam Code: NCM-MCI-6.5Q & A: 16 Q&AsUpdated:  2025-06-01

 Get All NCM-MCI-6.5 Q&As